

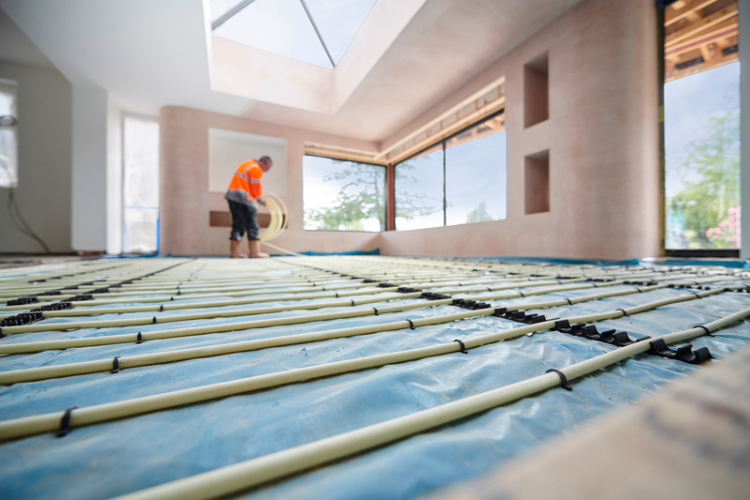
Wet underfloor heating installation involves laying a network of water pipes beneath the floor and connecting them to a heating system. The process typically includes floor preparation, insulation, pipework installation, pressure testing, floor covering and commissioning. Each stage matters because correct installation helps deliver even heat distribution, reliable operation and long-term performance. The exact method depends on the floor construction, heating design and manufacturer’s instructions.
How Does Wet Underfloor Heating Installation Work?
Wet underfloor heating circulates warm water through pipes installed beneath the finished floor. The installation method depends on whether the project uses a screed system, a suspended timber floor or a low-profile overlay system.
Stage 1: Prepare the Floor
Before installing components, the installer assesses the subfloor and confirms the planned floor build-up.
The surface must meet the system’s requirements for stability, cleanliness and level. Any necessary repairs or preparation should happen before insulation and pipework are installed.
Floor heights also need careful consideration. Doors, thresholds, stairs and adjoining rooms can all affect the available installation depth.
Stage 2: Install the Underfloor Heating Insulation
Suitable insulation helps reduce heat loss through the floor structure. The type and thickness depend on the building, floor construction and system specification.
Installers must fit insulation correctly and address gaps that could compromise its performance. Edge insulation may also be required around the perimeter of a screeded floor.
Why Insulation Matters
Without suitable insulation, more heat may escape downwards instead of warming the room. Consequently, insulation should form part of the overall heating design rather than an afterthought.
Laying Underfloor Heating Pipework
Stage 3: Position the Pipes
The installer lays the pipe according to the planned circuit layout and spacing. Each circuit connects to the manifold, which distributes water throughout the system.
Pipe spacing depends on the required heat output, floor construction and design calculations. Installers should follow the specified layout rather than choosing spacing by eye.
During installation, avoid kinking or damaging the pipe. Correct fixing also helps keep the layout secure while the floor covering is installed.
Stage 4: Connect the Manifold and Test the System
The pipe circuits connect to the manifold, which distributes water and supports circuit balancing.
Before covering the pipework, the installer should carry out the required pressure test in accordance with the system manufacturer’s instructions. This helps identify potential leaks while the pipework remains accessible.
Any problems must be resolved before proceeding. Testing records should also be retained as part of the installation documentation.
Installing Screed or an Overlay Floor System
Stage 5: Cover or Complete the Floor Assembly
For a traditional screed installation, the pipework is covered with the specified screed material. The installer must follow the screed manufacturer’s requirements for application, thickness and curing.
The heating system should not be brought into operation prematurely. Allow the screed to cure for the specified period before following the approved heating and drying procedure.
For overlay systems, the installer follows the panel manufacturer’s instructions instead. These systems use a different floor build-up and may avoid the need for a traditional screed layer.
Stage 6: Commission the Heating System
Commissioning checks that the system operates as intended. The installer verifies the manifold connections, flow rates, controls and circulation.
The heating should be brought up to operating temperature according to the relevant system and floor manufacturer’s guidance. Gradual commissioning is particularly important where screed is involved.
The installer should explain the controls and provide relevant documentation to the homeowner.
How Long Does Wet Underfloor Heating Installation Take?
Installation time depends on the floor area, system type and preparation required. A straightforward room may take less time than a whole-house installation involving extensive floor work.
Screed curing can also extend the project timeline. Therefore, distinguish between the time needed to install the system and the time needed before the finished floor can be laid or heating fully commissioned.
Frequently Asked Questions About Wet Underfloor Heating Installation
Does underfloor heating pipe need pressure testing?
Yes, installers should test the pipework according to the system manufacturer’s instructions before it is covered.
Does wet underfloor heating need insulation?
Suitable insulation helps reduce downward heat loss and should be specified for the floor construction.
How long should screed dry before underfloor heating is used?
Follow the screed manufacturer’s curing requirements and the approved commissioning procedure rather than using a universal drying time.
Can wet underfloor heating be installed in an existing home?
Yes, although floor height, insulation and the chosen installation method affect suitability.
Can I install wet underfloor heating myself?
Some preparation may be possible for experienced DIYers, but system design, plumbing connections and commissioning require appropriate expertise.
